Introduction
Maintaining brick walls is crucial for both structural integrity and aesthetic appeal. Over time, brick walls can develop holes due to various factors such as weather conditions, settling, or physical damage. Fortunately, patching these holes is a manageable DIY task that can restore your wall’s strength and appearance.
Tools and Materials Needed
Tools
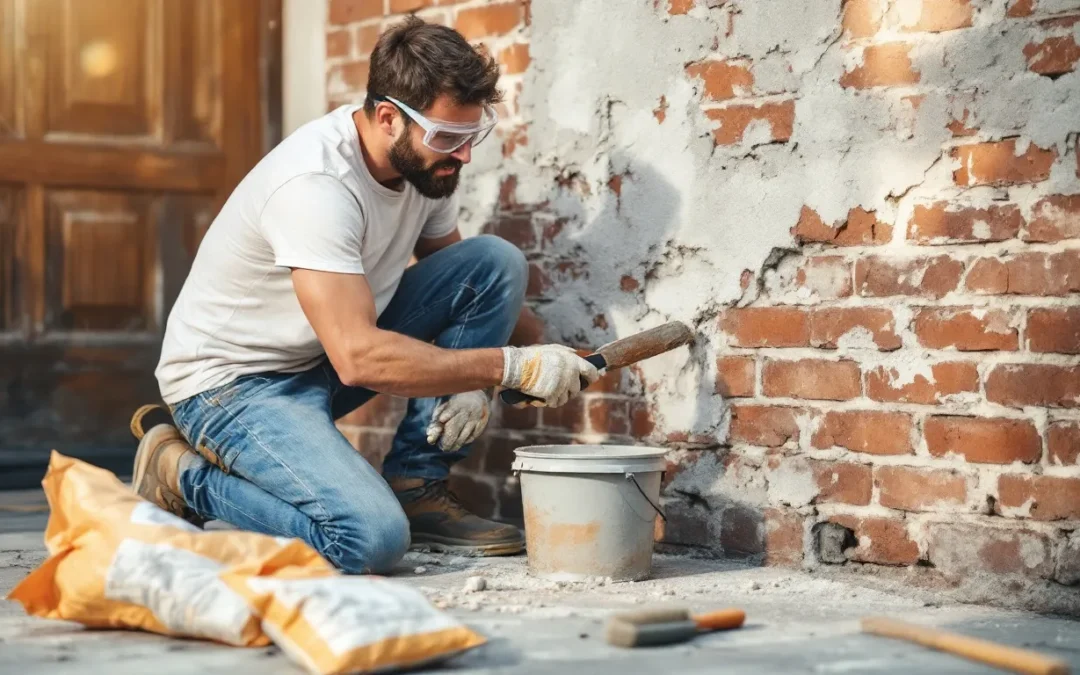
Before starting your patching project, gather the necessary tools. You will need a trowel for applying mortar, a hammer and chisel to shape the bricks, and a wire brush for cleaning. Additionally, wear safety goggles to protect your eyes, and keep a bucket handy for mixing mortar.
Materials
Choosing the right materials is essential for a successful repair. You will need a mortar mix, which can be purchased pre-mixed or made from scratch, and water for mixing. Depending on the hole’s size, you may also require bricks for larger repairs and a sealant to protect the patched area.
Assessing the Damage
Inspecting the Hole
Start by thoroughly inspecting the hole in your brick wall. Look for signs of cracks or other damage that may indicate underlying issues. Determining the cause of the hole, such as settling or weather deterioration, can help you decide if it’s a quick fix or if more extensive repairs are needed.
Evaluating Repair Need
If the hole is small, a simple patch may suffice. However, larger holes may indicate more severe damage and could require inserting new bricks or professional assessment. Being honest about the severity of the damage will save you time and resources in the long run.
Preparing the Area
Cleaning the Hole
The first step in preparation is cleaning the area around the hole. Remove any loose debris, dirt, or crumbling brick to ensure proper adhesion for the mortar. A wire brush is ideal for scrubbing the surrounding area, providing a clean surface for a secure patch.
Preparing the Mortar Mix
Next, prepare the mortar mix according to the package instructions. It’s essential to achieve the right consistency; the mixture should be thick enough to hold its shape but pliable enough for easy application. Aim for a consistency similar to peanut butter for the best results. Learn more about proper mix selection in this article on choosing the right concrete mix.
Patching the Hole
Filling Small Holes
For small holes, use your trowel to apply the mortar directly into the hole. Press it firmly into place to eliminate any air pockets and ensure a solid bond. Once filled, use the trowel to smooth the surface, feathering the edges to blend with the surrounding brick.
Repairing Larger Holes
In cases of larger holes, you may need to insert a brick. Fit the new brick snugly into the hole, then use mortar around it to secure it in place. Thoroughly press the mortar into the gaps and smooth it out with the trowel for a tidy finish. For a more advanced pre-pour setup, consider this checklist for commercial concrete jobs.
Finishing Touches
After filling and smoothing, the final step is to refine the joints. Smooth any visible mortar joints to create a seamless appearance. If desired, apply a sealant once the mortar has dried to provide additional protection against moisture and decay.
Curing the Mortar
Importance of Curing
Curing the mortar is a critical step that many DIYers overlook. Proper curing helps the mortar achieve maximum strength by allowing it to hydrate fully without drying out too quickly. This process can significantly extend the life of your repair. For more details, see Understanding Curing Times.
Curing Time Frame
Typically, mortar should cure for at least 24 to 48 hours before it is exposed to moisture. However, it can take several weeks for the mortar to reach its full strength, depending on weather conditions. Be patient and avoid disturbing the area during this period.
Recommended Curing Methods
To ensure effective curing, keep the patched area moist by lightly spraying it with water daily. Alternatively, you can cover the patched section with a damp cloth to retain moisture. Just avoid direct sunlight, which may dry out the mortar too quickly.
Tips for Maintenance and Prevention
Regular Inspections
Prevent future damage by scheduling regular inspections of your brick walls. Look for early signs of cracking, discoloration, or water damage. Catching these issues early can save you from more costly repairs down the line. For common problems to avoid, read Top 7 Mistakes to Avoid.
Addressing Humidity and Drainage
Check for humidity and drainage problems in your home, as these can contribute to brick damage. Ensure gutters and downspouts are functioning properly, directing water away from your walls. Proper landscaping can also help reduce moisture exposure.
Protecting Exposed Areas
Finally, take precautions to protect exposed brick areas from harsh weather. Applying a quality sealant can help block moisture infiltration and extend the lifespan of your brickwork. If your walls are susceptible to damage, consider installing awnings or canopies as an additional protective measure. Learn how weather impacts concrete pours for added context.
Conclusion
Patching a hole in a brick wall is a straightforward project that can lead to significant improvements in both appearance and safety. By following the steps outlined above, even beginners can tackle this task with confidence. Remember, routine maintenance and immediate repairs are key to keeping your brick walls in excellent condition.
If you need expert help or want your brick wall professionally evaluated, call us now at (916) 562-2345 for a free quote and consultation.